Download MotionEyeOS — Free for Raspberry Pi
Turn any Raspberry Pi into a full surveillance system. MotionEyeOS is a ready-to-flash Linux image with motion detection, multi-camera support, and a browser-based dashboard.
What Is MotionEyeOS?
A complete surveillance operating system for Raspberry Pi and other single-board computers
MotionEyeOS is a Linux distribution purpose-built for video surveillance. You download it, flash it to a microSD card, and your Raspberry Pi boots directly into a ready-to-use security camera system. No Linux knowledge required, no command-line setup, no package installation. The MotionEyeOS download includes everything: the operating system, the motion detection engine, and a browser-based dashboard you can access from any phone, tablet, or computer on your network.
The project started as a personal tool by developer Calin Crisan and grew into one of the most popular open-source surveillance solutions for single-board computers. It now lives under the motioneye-project organization on GitHub, where it has collected over 8,200 stars. The software runs on Raspberry Pi models 1 through 4 (including the Zero and Zero W), plus a range of other ARM boards like Banana Pi, Orange Pi, NanoPi, and ASUS Tinker Board.
How It Works
MotionEyeOS uses a read-only filesystem built on Buildroot, a minimal Linux framework that keeps resource usage extremely low. The entire OS consumes under 100 MB of RAM on a Pi 3, leaving plenty of headroom for camera processing. It pairs the lightweight motion daemon (the actual motion detection backend) with the motionEye web frontend, giving you a polished interface to configure cameras, set up alerts, and review footage.
Who Is It For?
Home security hobbyists, small business owners keeping an eye on their shop, makers who want a DIY camera system, and anyone who prefers not to pay monthly fees to a cloud surveillance company. If you have a spare Raspberry Pi and a USB webcam or Pi Camera Module sitting around, you can have a working surveillance setup within 15 minutes.
What Can It Do?
The system handles multiple cameras at once (USB webcams, Pi CSI modules, and network IP cameras via MJPEG or RTSP). It records video clips and snapshots when motion is detected, sends email alerts with attached images, uploads footage to Google Drive or Dropbox, generates timelapse videos, and streams live feeds over HTTP so you can watch from anywhere on your local network. You manage all of this through a clean web dashboard – no apps to install, no accounts to create.
Key Features
Everything you need to run a home surveillance system on a Raspberry Pi, built into one lightweight OS image
Multi-Camera Support
Connect USB webcams, Raspberry Pi CSI camera modules, and network IP cameras (MJPEG and RTSP streams) all at once. The dashboard displays a grid view of every connected feed. Each camera gets its own motion detection settings, recording schedule, and storage configuration. You can run up to 4 cameras on a Pi 3 or Pi 4 without significant lag, depending on resolution.
Motion Detection
Built-in motion detection engine with adjustable sensitivity, frame change threshold, and detection masking. Define specific areas of the frame to monitor or ignore. When motion is triggered, the system captures snapshots, records video clips, and fires off notifications.
Web-Based Dashboard
Access the full management interface from any browser on your network – phone, tablet, or desktop. No apps to install, no plugins required. The dashboard runs on port 80 and loads in seconds, even on older devices. Admin and viewer roles with separate passwords keep access controlled.
Flash-and-Boot Installation
Download the .img.xz file, flash it to an SD card with Balena Etcher or Raspberry Pi Imager, and power on your board. First boot auto-configures everything. The entire process takes about 5 minutes, and you do not need any Linux experience.
Email Alerts
Get email notifications with snapshot attachments the moment motion is detected. Configure your SMTP server (Gmail, Outlook, or any provider), set quiet hours, and choose which cameras trigger alerts. You can also limit the frequency to avoid inbox flooding during high-activity periods.
Cloud Upload
Automatically upload motion-triggered snapshots and video clips to Google Drive or Dropbox. This keeps your footage safe even if someone steals the Pi or the SD card fails. Configure upload intervals and file retention to manage cloud storage usage.
Timelapse & Scheduling
Create timelapse movies from captured frames over configurable time periods – useful for monitoring construction progress, plant growth, or daily traffic patterns. Working schedules let you enable motion detection only during specific hours or days of the week.
Flexible Storage
Store recordings on the local SD card, an attached USB drive, or a network share via SMB/CIFS. The system automatically manages disk space and can delete old files when storage gets low. FTP and SFTP access is also available for remote file retrieval.
Wi-Fi & Network
Built-in Wi-Fi support on Pi 3, Pi 4, and Pi Zero W. You can pre-configure Wi-Fi credentials before the first boot using the writeimage.sh script. Static IP assignment and DHCP are both supported. SSH access is available for advanced users who want direct system access.
Read-Only Filesystem
The OS runs from a read-only partition, which dramatically extends SD card lifespan by eliminating constant write operations. This design also makes the system more reliable – unexpected power loss will not corrupt the filesystem. Configuration changes are saved to a small writable overlay partition. The Buildroot base keeps the OS minimal, using fewer than 100 MB of RAM on most boards.
Live MJPEG Streaming
Each camera outputs a live MJPEG stream over HTTP that you can embed in other applications, pull into Home Assistant, or view from a dedicated monitoring screen. The stream URL follows a predictable format, making integration straightforward for power users.
Text & Timestamp Overlay
Add configurable text overlays to your camera feeds – timestamps, camera names, custom labels. These overlays are burned into recordings and snapshots, making it easy to identify when and where footage was captured when reviewing later.
System Requirements
MotionEyeOS runs on ARM-based single-board computers. Here is what you need to get started.
Supported Boards
Download MotionEyeOS v20200606
Choose the correct image for your board. All downloads are free, open source, and hosted on GitHub.
Downloads are compressed .img.xz files. Extract with 7-Zip (Windows) or xz -d (macOS/Linux) before flashing. For other boards (Banana Pi, Orange Pi, Odroid, etc.), check the full release page on GitHub.
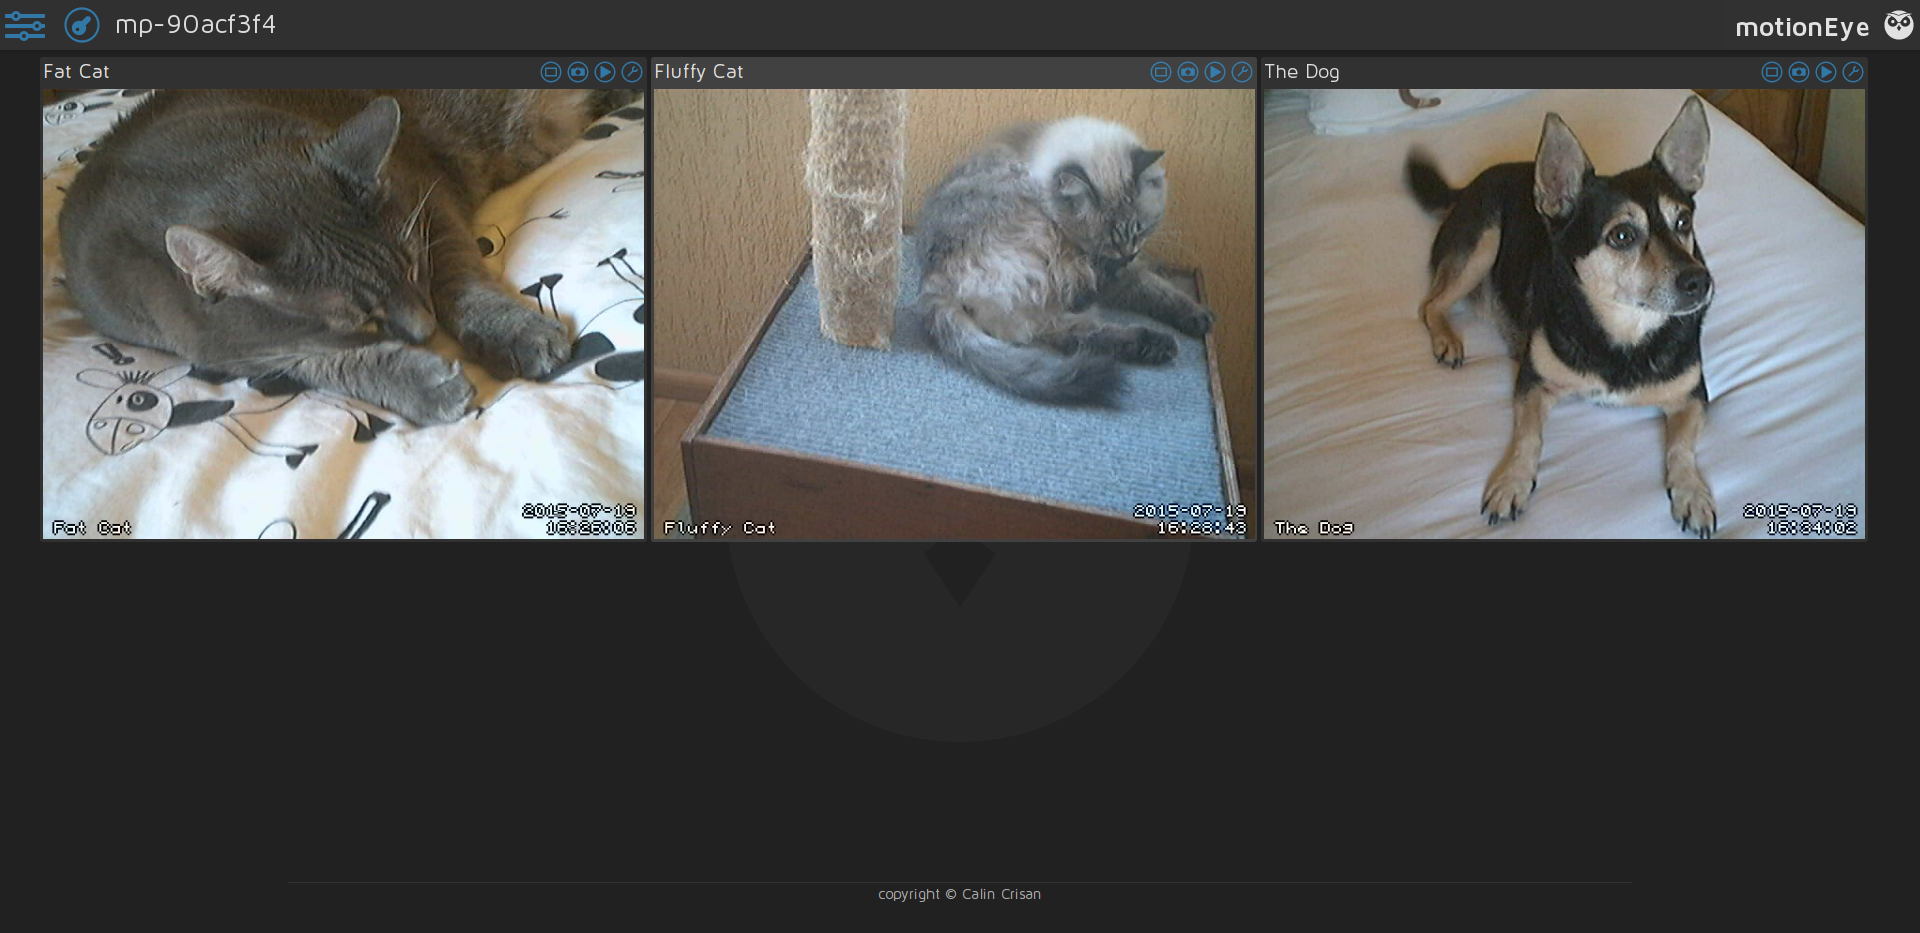
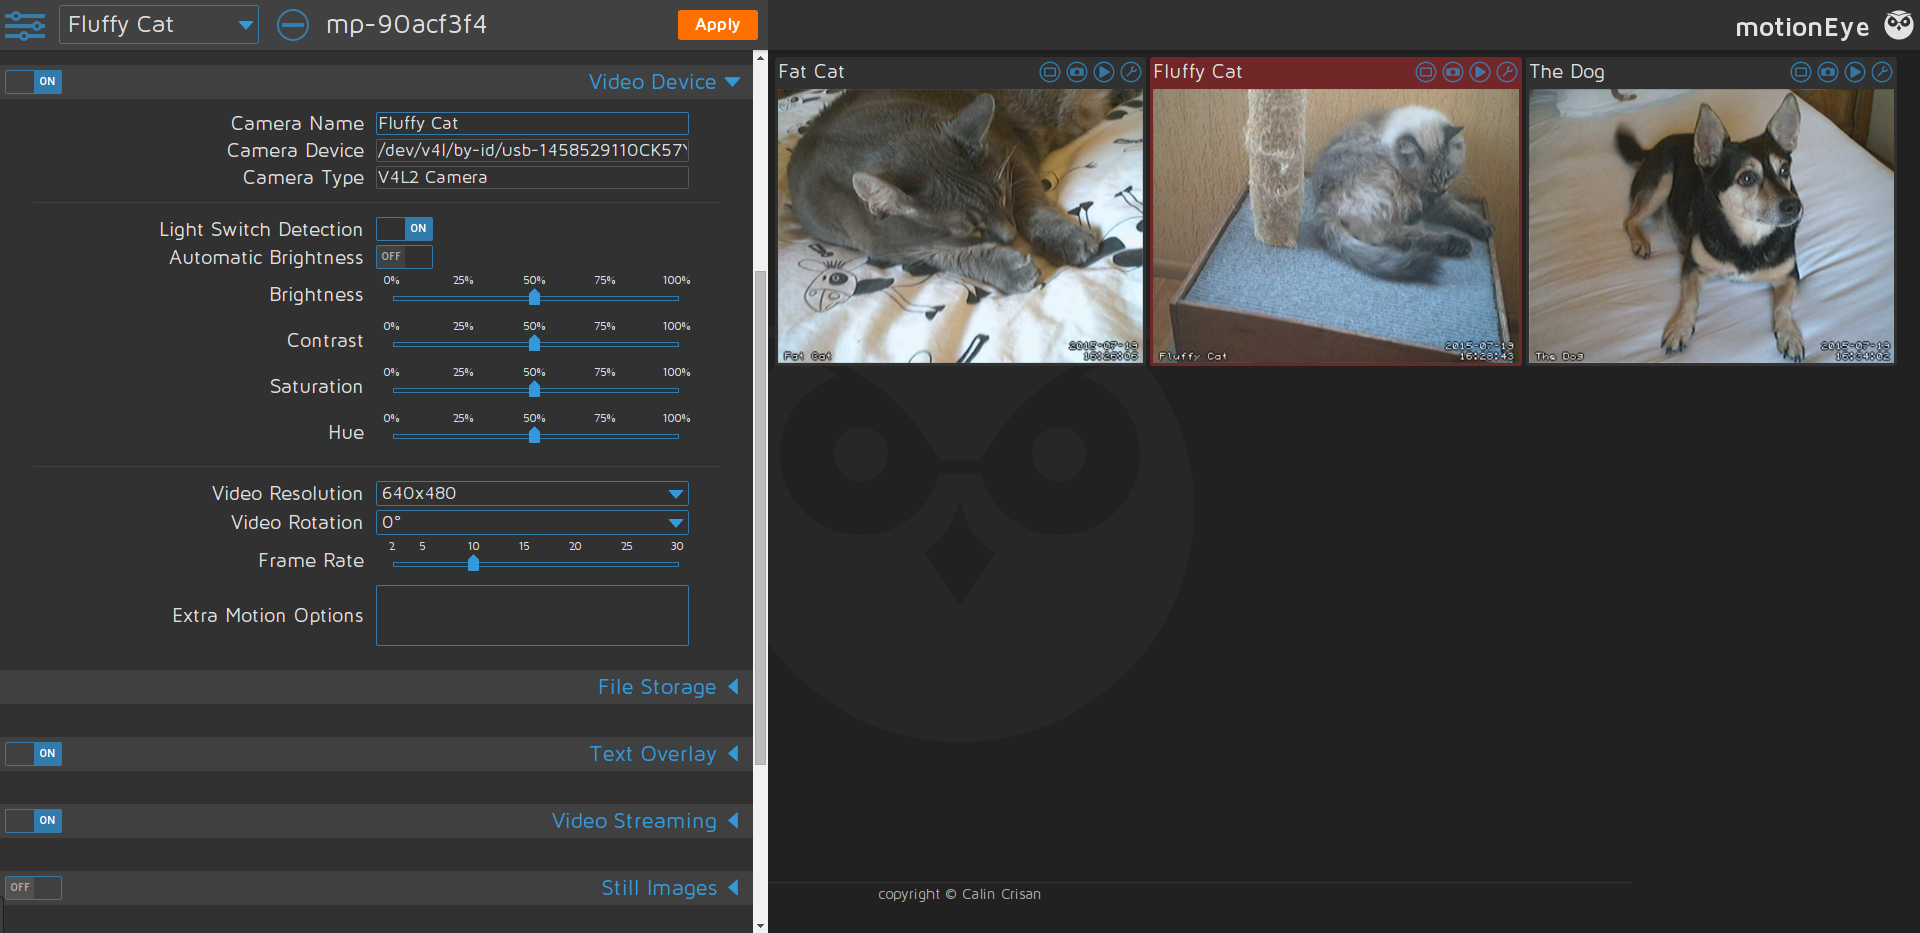
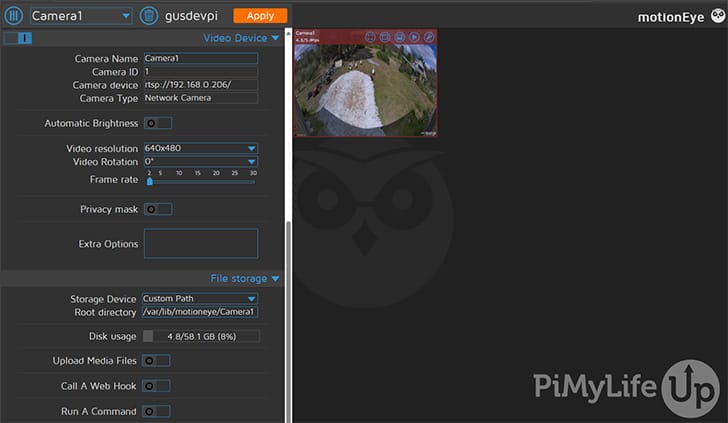
Screenshots
See the motionEye web interface in action – camera feeds, settings, and management dashboard
How to Install MotionEyeOS
From download to a working surveillance system in about 15 minutes. No Linux experience needed.
Download the Image
Head to our download section and grab the correct image file for your board. Raspberry Pi 4 users download the Pi 4 image, Pi 3 users download the Pi 3 image, and so on. The file will be a compressed .img.xz archive, typically between 42-62 MB depending on the board.
After downloading, extract the .img.xz file to get the raw .img disk image:
- Windows: Use 7-Zip (right-click → Extract Here)
- macOS: Double-click the file or run
xz -d filename.img.xzin Terminal - Linux: Run
xz -d filename.img.xzin the terminal
Flash the Image to Your SD Card
Insert a microSD card (4 GB minimum, 16 GB+ recommended if you want to store recordings locally) into your computer. Use one of these tools to write the image:
- Balena Etcher (recommended) – Works on Windows, macOS, and Linux. Select the .img file, pick your SD card, and click Flash.
- Raspberry Pi Imager – Under “Use custom”, select the extracted .img file.
- dd command (Linux/macOS) – For advanced users:
sudo dd if=motioneyeos.img of=/dev/sdX bs=4M
Pre-Configure Wi-Fi (Optional)
If you plan to use Wi-Fi instead of Ethernet, you can configure it before the first boot. On the flashed SD card, create a file called wpa_supplicant.conf in the boot partition with your network credentials:
writeimage.sh script on Linux/macOS to flash the image with Wi-Fi credentials baked in. See the wiki for details.
Boot Up & Connect
Insert the SD card into your Raspberry Pi. Connect an Ethernet cable (if not using Wi-Fi), plug in your USB webcam or Pi Camera Module, and connect the power supply. The first boot takes 1-2 minutes while the system auto-configures itself and expands the filesystem.
Once booted, find your Pi on the network. The hostname starts with meye- followed by a random string. You can find it using:
- Your router’s admin page (look for a device starting with “meye-“)
- A network scanner app like Fing (iOS/Android)
- On Linux/macOS:
ping meye-*.local
Open the Dashboard & Configure
Open a web browser and navigate to http://<your-pi-ip> (for example, http://192.168.1.42). You will see the motionEye login screen. The default login is:
- Username: admin
- Password: (blank – leave empty)
From here, configure your cameras, set motion detection sensitivity, choose where to store recordings, and set up email or cloud upload notifications. The interface is straightforward – click the wrench icon next to any camera to adjust its specific settings.
Need the image file? Download MotionEyeOS from our download section above.
Frequently Asked Questions
Common questions about downloading, installing, and using MotionEyeOS on Raspberry Pi
Is MotionEyeOS free to download?
Yes, MotionEyeOS is 100% free to download and use. The project is released under the GNU General Public License v2 (GPLv2), which means you can download, install, modify, and redistribute it without paying a single cent. There are no premium tiers, no subscription fees, no feature gates, and no trial periods.
Here is what you get for free:
- Full OS image – The complete operating system image for your Raspberry Pi model, ready to flash
- All features unlocked – Multi-camera support, motion detection, email alerts, cloud uploads, scheduling, and every other feature are included
- Source code access – The entire codebase is publicly available on GitHub under the motioneye-project organization
- No account required – Download directly from GitHub Releases without signing up, logging in, or providing an email address
The image files range from 42 MB (Pi 1/Zero) to 62 MB (Pi 4), and you can download them as many times as you need. Unlike commercial surveillance systems like Blue Iris ($65 license) or Reolink NVR (monthly cloud fees), MotionEyeOS will never charge you for any functionality.
Is MotionEyeOS safe to use?
Yes, MotionEyeOS is safe to download and run on your Raspberry Pi. It is an open-source project with its full source code available on GitHub, meaning anyone can audit the code for security issues. The pre-built image files are hosted directly on GitHub Releases – not on third-party download mirrors or file hosting sites that might bundle adware.
Here are the key safety facts:
- 8,200+ GitHub stars – One of the most popular open-source surveillance projects, used by thousands of people worldwide
- No telemetry or data collection – MotionEyeOS does not phone home, track usage, or send data to external servers
- Local network operation – Your camera feeds stay on your local network by default. Nothing leaves your home unless you explicitly configure cloud uploads or remote access
- Verified source – Images come directly from the official GitHub repository at
github.com/motioneye-project/motioneyeos
That said, there are a few security steps you should take after installation:
- Change the default admin password immediately – The default login is username “admin” with a blank password. Anyone on your network could access your cameras if you leave this unchanged.
- Set a separate surveillance password – This creates a viewer-only account for people who should see feeds but not change settings.
- Avoid port forwarding – If you want remote access, use a VPN (like WireGuard or Tailscale) instead of exposing port 80 to the internet. The motionEye web interface does not use HTTPS by default.
Does MotionEyeOS work on Raspberry Pi 5?
No, MotionEyeOS does not support the Raspberry Pi 5. The last stable release (v20200606, dated June 2020) was built before the Pi 5 existed, and the project has not received updates to add Pi 5 compatibility. Flashing the existing images to a Pi 5 will not boot because the bootloader, kernel, and device tree files do not match Pi 5 hardware.
What boards does MotionEyeOS support?
- Raspberry Pi 1 Model A/B/A+/B+
- Raspberry Pi 2 Model B
- Raspberry Pi 3 Model B/B+/A+
- Raspberry Pi 4 Model B (all RAM variants)
- Raspberry Pi Zero and Zero W
- Several non-Pi boards: Banana Pi, NanoPi, Odroid, Orange Pi, Pine64, ASUS Tinker Board
If you have a Pi 5, here are your best options:
- Install motionEye on Raspberry Pi OS – Install the standalone motionEye web application on a fresh Raspberry Pi OS installation. Run
sudo pip install motioneyeand you get the same web dashboard and camera management features. This works on Pi 5 because it runs on top of a full OS that already supports the hardware. - Use Frigate NVR – A Docker-based network video recorder with AI-powered object detection. It runs well on Pi 5 and can distinguish people, cars, and animals from generic motion.
- Try RPi Cam Web Interface – A lighter alternative specifically designed for Raspberry Pi cameras, though it lacks multi-camera support.
Is MotionEyeOS still maintained?
MotionEyeOS (the full operating system image) has not received a new release since June 6, 2020 (version 20200606). The project is in maintenance mode – it is considered stable and functional, but no active development is happening on the OS images. There was a pre-release build dated October 26, 2020, but it was never marked as a stable release.
What does this mean in practice?
- The v20200606 images still work – Users running Pi 1 through Pi 4 report stable performance with the latest release. The software does not break over time since it runs on a self-contained read-only filesystem.
- No new board support – The Pi 5, Pi Zero 2 W, and any boards released after 2020 will not get official images.
- No security patches for the OS layer – The underlying Buildroot Linux system is frozen at 2020 versions. This matters less than it sounds since the device should only be on your local network.
- No new camera driver updates – Very new USB cameras or those requiring updated drivers may not work.
The motionEye web application is a separate project – and it does receive occasional updates. Developer Calin Crisan and community contributors have pushed patches to the motionEye frontend independently. You can install the latest motionEye on any Linux system (including Raspberry Pi OS) using pip.
sudo pip install motioneye. You get the same web interface with a modern kernel underneath.What are the system requirements for MotionEyeOS?
MotionEyeOS is lightweight and runs on most ARM-based single-board computers. Here are the complete hardware requirements broken down by component:
Required Hardware:
- Board: Raspberry Pi 1, 2, 3, 4, Zero, or Zero W. Also supports Banana Pi M1, NanoPi Neo/Neo2, Odroid C1/C2/XU4, Orange Pi One/Zero, Pine64, and ASUS Tinker Board.
- Storage: microSD card, 4 GB minimum. Use 16 GB or larger if you plan to store motion-triggered recordings directly on the card. Class 10 or UHS-I speed rating is recommended for smooth video writing.
- Camera: At least one of these: USB webcam (must be UVC-compatible), Raspberry Pi Camera Module (CSI ribbon cable), or a network IP camera with MJPEG or RTSP output.
- Network: Ethernet cable or Wi-Fi (built into Pi 3, Pi 4, Pi Zero W). Ethernet is recommended for reliability and lower latency.
- Power Supply: 5V / 2.5A for Pi 3 and older, 5V / 3A USB-C for Pi 4. An underpowered supply causes CPU throttling, random reboots, and video stuttering.
RAM guidelines by use case:
- 256 MB (Pi Zero): One camera at 640×480, motion-triggered snapshots only
- 512 MB (Pi 1): One camera at 720p with motion detection and recording
- 1 GB (Pi 2/3): Two to three cameras at 720p, comfortable for most setups
- 2-4 GB (Pi 4): Four cameras at 720p or two at 1080p, with motion detection and cloud upload running
The OS itself uses under 100 MB of RAM thanks to its minimal Buildroot base. The rest is available for camera processing.
How do I install MotionEyeOS on a Raspberry Pi?
Installing MotionEyeOS takes about 10-15 minutes and requires no Linux knowledge. The process involves downloading an image file, flashing it to an SD card, and booting your Pi. Here is the step-by-step process:
Step 1: Download the image
Go to our download section and download the correct .img.xz file for your Pi model. Pi 4 users need the Pi 4 image, Pi 3 users need the Pi 3 image, and so on. File sizes range from 42 MB (Pi 1/Zero) to 62 MB (Pi 4).
Step 2: Extract the compressed file
- Windows: Right-click the .img.xz file and select “Extract Here” using 7-Zip
- macOS/Linux: Run
xz -d motioneyeos-raspberrypi4-20200606.img.xzin a terminal
Step 3: Flash to SD card
Insert a microSD card (4 GB minimum, 16 GB+ recommended) into your computer. Open Balena Etcher or Raspberry Pi Imager, select the extracted .img file, choose your SD card, and click Flash. This takes 2-5 minutes.
Step 4: Boot the Pi
Insert the flashed SD card into your Raspberry Pi, connect an Ethernet cable and your camera, then plug in the power supply. The first boot takes about 1-2 minutes while the system auto-configures and expands the filesystem.
Step 5: Access the dashboard
Find your Pi’s IP address through your router admin page (look for a device starting with “meye-“) or a network scanner app like Fing. Open a web browser and navigate to http://<your-pi-ip>. Log in with username admin and leave the password field empty.
How do I connect MotionEyeOS to Wi-Fi?
MotionEyeOS supports Wi-Fi on boards with built-in wireless (Pi 3, Pi 4, Pi Zero W) or with a compatible USB Wi-Fi adapter on older boards. There are two methods to configure Wi-Fi, and both must be done before or during the first boot since you need network access to reach the web interface.
Method 1: wpa_supplicant.conf file (easiest)
- After flashing the MotionEyeOS image to your SD card, remove and re-insert the card into your computer
- Open the boot partition (the small FAT32 partition that shows up in your file manager)
- Create a new text file named
wpa_supplicant.conf - Add the following content, replacing with your network details:
country=USupdate_config=1ctrl_interface=/var/run/wpa_supplicantnetwork={ ssid="YourNetworkName" psk="YourWiFiPassword"}
Method 2: writeimage.sh script (Linux/macOS only)
The official writeimage.sh script combines flashing and Wi-Fi configuration into one step. It writes the image to the SD card and bakes your Wi-Fi credentials directly into the filesystem. Download it from the MotionEyeOS GitHub wiki and run:
./writeimage.sh -d /dev/sdX -i motioneyeos.img -s "YourSSID" -p "YourPassword"
Important notes:
- The
countrycode must match your location (US, GB, DE, etc.) – this sets the correct Wi-Fi regulatory domain - Pi 1, Pi 2, and original Pi Zero do not have built-in Wi-Fi. You need a USB Wi-Fi adapter with Linux driver support (the Edimax EW-7811Un is a popular, compatible option)
- 5 GHz networks are only supported on Pi 3B+ and Pi 4
Can I use MotionEyeOS with IP cameras (RTSP)?
Yes, MotionEyeOS fully supports network IP cameras that provide MJPEG or RTSP video streams. You can use IP cameras alongside USB webcams and Pi Camera modules on the same system, mixing different camera types freely.
How to add a network IP camera:
- Open the motionEye web interface in your browser
- Click the drop-down menu in the top-left corner (next to the camera name)
- Select “add camera”
- Choose “Network camera” as the camera type
- Enter the camera’s stream URL in the URL field. Common formats include:
- RTSP:
rtsp://192.168.1.100:554/stream1 - MJPEG:
http://192.168.1.100:8080/video
- RTSP:
- If your camera requires authentication, enter the username and password
- Click “OK” to add the camera
Performance considerations:
- Each IP camera stream consumes CPU cycles for decoding. A Pi 3 can handle 2-3 IP cameras at 720p. A Pi 4 can handle 4-5 comfortably.
- MJPEG uses less CPU than RTSP because MJPEG frames are individual JPEGs (no inter-frame decoding needed). If your camera supports both protocols, try MJPEG first.
- Use the camera’s sub-stream (lower resolution secondary stream) if available. Many cameras offer a 640×480 sub-stream that is much lighter on the Pi’s CPU than the full 1080p main stream.
- IP cameras send data over your network, so wired Ethernet on the Pi side reduces latency compared to Wi-Fi.
Compatible camera brands: Most modern IP cameras work, including Hikvision, Dahua, Reolink, Amcrest, TP-Link Tapo, and Wyze (with RTSP firmware). Check your camera’s documentation for the exact RTSP URL format.
How do I set up email notifications for motion detection?
MotionEyeOS can send you an email with a snapshot attached whenever motion is detected on any camera. This requires configuring an SMTP email server in the web interface. Here is the complete setup process:
Step-by-step configuration:
- Open the motionEye dashboard and click the wrench/settings icon for the camera you want to configure
- Scroll down to the “Motion Notifications” section
- Toggle “Send An Email” to ON
- Fill in the SMTP settings:
- Email Server: Your SMTP server address
- Port: Usually 587 (TLS) or 465 (SSL)
- Account: Your full email address
- Password: Your email password or app-specific password
- From Address: The sender email address
- To Address: Where you want to receive alerts
- Click Apply to save
Gmail-specific settings:
- Email Server:
smtp.gmail.com - Port:
587with TLS enabled - You must generate an App Password in your Google account (Security > 2-Step Verification > App Passwords). Regular Gmail passwords will not work if you have 2-factor authentication enabled.
Other common providers:
- Outlook/Hotmail:
smtp.office365.com, port 587 - Yahoo:
smtp.mail.yahoo.com, port 465 - Custom domain: Check with your hosting provider for SMTP details
You can also set a notification interval (e.g., one email every 5 minutes) to avoid inbox flooding when there is continuous motion, like wind blowing tree branches in the camera’s view.
Can I integrate MotionEyeOS with Home Assistant?
Yes, MotionEyeOS integrates well with Home Assistant, and the setup is straightforward. MotionEyeOS exposes each camera as an MJPEG stream over HTTP, which Home Assistant can pull directly into its dashboard.
Method 1: MJPEG Camera Integration (recommended)
- In Home Assistant, go to Settings > Devices & Services > Add Integration
- Search for “MJPEG IP Camera”
- Enter the stream URL for your camera:
- Camera 1:
http://<pi-ip>:8081 - Camera 2:
http://<pi-ip>:8082 - Camera 3:
http://<pi-ip>:8083(and so on)
- Camera 1:
- Enter the surveillance user credentials if you have set them in motionEye
- Your camera feed will now appear as an entity in Home Assistant
Method 2: motionEye Integration Add-on
Home Assistant also has a dedicated motionEye integration (available through HACS or built-in) that provides deeper control, including the ability to manage camera settings and receive motion events directly as Home Assistant events.
Method 3: Webhooks for motion-triggered automations
MotionEyeOS can fire an HTTP request (webhook) whenever motion is detected. In the camera settings, scroll to “Motion Notifications” and enable “Call a Web Hook.” Point the URL to a Home Assistant webhook endpoint. This lets you trigger automations like:
- Turning on porch lights when the front door camera detects motion
- Sending a push notification to your phone
- Recording a clip from a different camera
- Triggering an alarm siren via a smart plug
How much storage do I need for continuous recording?
Storage requirements depend on your resolution, frame rate, number of cameras, and whether you record continuously or only on motion. Here are real-world estimates to help you plan:
Motion-triggered recording (most common setup):
- 640×480 @ 10 fps: 500 MB – 2 GB per camera per day (in a moderately active area like a front porch)
- 1280×720 @ 15 fps: 2 – 5 GB per camera per day
- 1920×1080 @ 15 fps: 5 – 12 GB per camera per day
Continuous recording (24/7):
- 640×480 @ 10 fps: 3 – 5 GB per camera per day
- 1280×720 @ 15 fps: 8 – 15 GB per camera per day
- 1920×1080 @ 15 fps: 15 – 30 GB per camera per day
Storage recommendations by use case:
- 16 GB SD card: Enough for 1 camera with motion-triggered recording for 3-5 days at 720p
- 32 GB SD card: Good for 1-2 cameras with motion recording for about a week
- 64 GB SD card: Suitable for 2-3 cameras with motion recording for 5-7 days
- External USB drive (500 GB+): Recommended for multi-camera setups or if you want several weeks of retention
- Network share (NAS): Best option for long-term storage with terabytes of capacity
MotionEyeOS includes an automatic disk cleanup feature that deletes the oldest recordings when storage reaches a threshold you set (e.g., 90% full). This prevents the system from running out of space and crashing.
MotionEyeOS vs Frigate NVR – which is better?
MotionEyeOS and Frigate NVR are both popular open-source surveillance solutions, but they target different users with different hardware and skill levels. Here is a detailed comparison:
MotionEyeOS – Best for simplicity and Pi-based setups
- Installation: Flash an SD card and boot. No Linux knowledge needed. Takes 5 minutes.
- Hardware: Runs directly on Raspberry Pi 1-4 and similar ARM boards. No additional hardware required.
- Detection: Basic pixel-change motion detection. Detects any movement but cannot distinguish between a person, car, animal, or swaying tree.
- Interface: Built-in web dashboard accessible from any browser.
- Resource usage: Under 100 MB RAM. Works on a Pi Zero with a single camera.
- Cost: Free. Only the Pi and camera.
Frigate NVR – Best for smart detection and power users
- Installation: Requires Docker, YAML configuration files, and more technical setup. Plan 30-60 minutes minimum.
- Hardware: Needs a Pi 4 (4 GB+), mini PC, or NAS. Strongly benefits from a Google Coral TPU ($25-60) for AI detection without high CPU usage.
- Detection: AI-powered object detection using machine learning models. Identifies people, cars, cats, dogs, and other objects. Dramatically reduces false alerts.
- Interface: Web UI with live view, event timeline, and object filtering. Deep Home Assistant integration.
- Resource usage: 1-2 GB RAM minimum. CPU-heavy without a Coral TPU.
- Cost: Free software, but the Coral TPU is a recommended additional purchase.
Bottom line: Choose MotionEyeOS if you want a dead-simple camera system on a spare Pi with minimal fuss. Choose Frigate if you are tired of false motion alerts (wind, shadows, animals) and want a system that only notifies you when an actual person or car is detected.
How do I update MotionEyeOS to the latest version?
MotionEyeOS does not have a built-in over-the-air (OTA) update mechanism. Updating requires downloading a new image and flashing a fresh SD card. Here is the complete process:
Step 1: Back up your current settings
Before updating, save your camera configurations so you do not have to redo them from scratch. Connect to your Pi via SSH (default port 22, username admin) and copy the configuration directory:
scp -r admin@<pi-ip>:/data/etc ./motioneyeos-backup/
This directory contains your camera settings, motion detection parameters, Wi-Fi configuration, and user passwords.
Step 2: Download and flash the new image
- Download the latest image for your board from our download section
- Flash it to a new SD card (keep your old card as a fallback)
- If using Wi-Fi, add the
wpa_supplicant.conffile to the boot partition
Step 3: Boot and restore settings
- Insert the new SD card and power on the Pi
- Wait for the first boot to complete (1-2 minutes)
- SSH into the Pi and copy your backed-up config files back to
/data/etc/ - Reboot the Pi:
reboot
Current version status:
- Latest stable release: v20200606 (June 6, 2020)
- Pre-release build: dev20201026 (October 26, 2020) – available on GitHub but not marked as stable
- Most users are already running the latest version since no new stable releases have been published since 2020
Why is my MotionEyeOS video feed laggy or slow?
A laggy or stuttering video feed in MotionEyeOS is usually caused by one of several common issues. Here is how to diagnose and fix each one:
1. Resolution and frame rate too high for your board
This is the most common cause. Each Pi model has different processing limits:
- Pi Zero / Pi 1: Maximum comfortable: 640×480 at 5-10 fps for a single camera
- Pi 2: 720p at 10-15 fps for one camera, 640×480 for two cameras
- Pi 3: 720p at 15 fps for 2-3 cameras, or 1080p for one camera
- Pi 4: 1080p at 15 fps for 2 cameras, or 720p for 3-4 cameras
To fix: Open camera settings in the motionEye dashboard and lower the Video Resolution and Frame Rate.
2. Underpowered power supply
A Pi that does not get enough current will throttle its CPU to prevent damage. You will often see a yellow lightning bolt icon on screen (if connected to a monitor) or experience random freezes. Use a quality power supply rated at 2.5A (Pi 3) or 3A (Pi 4). Cheap phone chargers are often not sufficient.
3. Network bottleneck (Wi-Fi vs Ethernet)
Wi-Fi adds latency and can drop frames, especially if the Pi is far from the router or there is interference. Switching to a wired Ethernet connection typically reduces feed latency by 50-200ms.
4. IP camera using RTSP instead of MJPEG
RTSP streams require the Pi to decode H.264 or H.265 video frames, which is CPU-intensive. MJPEG streams send individual JPEG frames that are much simpler to process. If your IP camera supports both protocols, switch to MJPEG for lower CPU usage.
5. SD card too slow
If you are recording video to the SD card and the card’s write speed is too low, it can cause the whole system to stall. Use a Class 10 or UHS-I rated card. Better yet, store recordings on a USB drive or network share.
top to check CPU usage. If it is consistently above 90%, you are overloading the board. Lower the resolution, reduce the number of cameras, or upgrade to a more powerful Pi model.How do I fix “unable to open video device” error?
The “unable to open video device” error means MotionEyeOS cannot detect or access your camera hardware. This can happen with USB webcams, Pi Camera Modules, or misconfigured network cameras. Here are the fixes for each camera type:
For USB Webcams:
- Unplug and reconnect the webcam, then reboot the Pi
- Verify UVC compatibility – MotionEyeOS uses the Video4Linux (V4L2) driver framework. Most modern webcams are UVC-compatible, but very old or exotic models may not be. Check the Linux UVC driver device list if unsure.
- Avoid USB hubs – Connect the webcam directly to the Pi’s USB port. Hubs can cause power or bandwidth issues.
- Check power – Some webcams draw too much power for the Pi’s USB port. Try a powered USB hub if the camera requires more current.
- Verify detection via SSH: Log into the Pi and run
ls /dev/video*. You should see/dev/video0(or similar). If nothing appears, the camera is not being recognized at the hardware level.
For Raspberry Pi Camera Module (CSI):
- Check the ribbon cable – The most common issue. Make sure the cable is firmly seated in the CSI connector on both the camera board and the Pi. The silver contacts should face the correct direction (toward the Ethernet/USB ports on most Pi models).
- Verify camera detection: SSH in and run
vcgencmd get_camera. You should seesupported=1 detected=1. If detected=0, the cable connection or camera module has a problem. - Check for physical damage – Inspect the ribbon cable for tears, creases, or bent pins. These cables are fragile.
For Pi 4 with USB 3.0 webcams:
Some USB 3.0 webcams have compatibility issues with the Pi 4’s USB 3.0 controller. Try plugging the camera into a USB 2.0 port (the black ports, not the blue ones) as a workaround.
General troubleshooting:
- SSH in and check the system log:
cat /var/log/messages | grep -i video - If multiple cameras are connected, make sure each is assigned a unique device path in motionEye settings
- Reboot the Pi after any cable changes:
reboot
Can MotionEyeOS upload footage to Google Drive?
Yes, MotionEyeOS can automatically upload motion-triggered snapshots and video clips to Google Drive. This is useful as an off-site backup – if someone steals the Pi or the SD card fails, your footage is still safe in the cloud.
How to set up Google Drive upload:
- Open the motionEye web interface and click the settings icon (wrench) for the camera you want to configure
- Scroll down to the “File Storage” section
- Enable “Upload Media Files”
- Select “Google Drive” as the upload service
- Click the authorization link that appears. This opens a Google OAuth page where you grant MotionEyeOS permission to write files to your Drive.
- Copy the authorization code from Google and paste it back into the motionEye settings
- Set the upload folder name (e.g., “MotionEyeOS/FrontDoor”)
- Choose what to upload: snapshots only, videos only, or both
- Click Apply
Important settings to configure:
- Upload interval: How often files are pushed to Drive. Setting this too low can overload a Pi Zero’s CPU.
- File retention in Drive: MotionEyeOS does not automatically clean up old files in Google Drive. You will need to manually delete old footage or set up a Google Drive automation to manage storage.
Dropbox is also supported as an alternative cloud destination. The setup process is similar – enable Dropbox in File Storage settings and authorize through OAuth.
Storage considerations: Google Drive offers 15 GB free. A single camera generating 1 GB of motion-triggered clips per day would fill this in about two weeks. If you need more, upgrade to Google One (100 GB for $1.99/month) or use Dropbox with similar pricing.
Does MotionEyeOS work offline?
MotionEyeOS works partially offline. The core surveillance functions operate without any internet connection, but some features require network access. Here is the full breakdown:
Works without internet:
- Motion detection – The motion detection engine runs locally on the Pi and does not need internet
- Local recording – Video clips and snapshots are saved to the SD card, USB drive, or attached storage
- Timelapse generation – Timelapse movies are created locally from stored frames
- Web interface on LAN – You can still access the motionEye dashboard from any device on the same local network, even with no internet connection
- Scheduling – Recording schedules and working hours continue to operate based on the Pi’s internal clock
Requires internet:
- Email notifications – Sending alerts via SMTP needs an internet connection
- Cloud uploads – Google Drive and Dropbox uploads will fail without internet and queue up
- Remote access – Viewing cameras from outside your local network (via port forwarding or VPN) needs internet
- Time synchronization – The Pi does not have a hardware real-time clock. Without internet, timestamps may drift after reboot. You can fix this by adding a $5 RTC module (DS3231)
Requires local network (but not internet):
- Initial setup – You need to access the web interface from a browser, which requires your device and the Pi to be on the same local network
- IP camera streams – Network cameras communicate over your LAN, which works without internet
- Network storage – SMB/CIFS shares on your local NAS work without internet
Fully isolated deployment (no network at all): If you need a camera with zero network connectivity, connect a USB webcam and store recordings on a USB drive. You will not be able to access the web interface remotely, but recordings will still be captured. To review footage, plug the USB drive into a computer.
What are the best alternatives to MotionEyeOS?
Several open-source and commercial surveillance platforms can serve as alternatives to MotionEyeOS, each with different strengths. Here is a detailed comparison of the top options:
1. motionEye (standalone installation)
- What it is: The same web interface as MotionEyeOS, installed as an application on top of an existing Linux OS (Raspberry Pi OS, Debian, Ubuntu)
- Best for: Users who want the motionEye experience on Pi 5 or with a more up-to-date OS
- Install:
sudo pip install motioneyeon any Linux system - Pros: Pi 5 support, OS updates separate from motionEye updates, access to full Linux tools
- Cons: Setup takes longer than flashing an SD card, not as “appliance-like”
2. Frigate NVR
- What it is: A Docker-based NVR with real-time AI object detection using machine learning
- Best for: Users who need smart alerts (only notify when a person or car is detected, not every moving shadow)
- Pros: AI detection (people, cars, animals), deep Home Assistant integration, event-based recording saves storage
- Cons: Requires Docker knowledge, benefits greatly from a Google Coral TPU ($25-60), needs Pi 4 (4 GB) or better hardware
3. ZoneMinder
- What it is: A mature, full-featured NVR platform that has been in development since 2002
- Best for: Large installations with many cameras on x86 server hardware
- Pros: Supports dozens of cameras, extensive recording and playback features, active development community
- Cons: Heavy on resources (not suitable for Pi), complex web interface, steep learning curve for setup
4. Shinobi
- What it is: A Node.js-based open-source CCTV platform with a modern web interface
- Best for: Users who want a modern-looking dashboard with WebSocket-based live streaming
- Pros: Clean UI, multi-user support with permission levels, plugin system for custom features
- Cons: Resource-hungry (not ideal for Pi Zero or Pi 1), can be complex to configure
5. Blue Iris (commercial)
- What it is: A commercial Windows NVR with a one-time $65 license
- Best for: Windows users who want a polished, reliable, feature-rich NVR without the DIY setup
- Pros: Excellent IP camera support, AI detection add-on, very stable, active development
- Cons: Windows only, paid, does not run on Pi or Linux
6. Agent DVR (iSpy)
- What it is: Free open-source DVR software with optional cloud features
- Best for: Cross-platform users who want a free alternative to Blue Iris
- Pros: Runs on Windows, Linux, and macOS. Optional cloud remote access.
- Cons: Cloud features require a subscription, desktop app feel rather than embedded system
How do I set a static IP address on MotionEyeOS?
Setting a static IP address ensures your MotionEyeOS Pi always has the same network address, making it easy to bookmark the dashboard URL and preventing integrations (like Home Assistant) from breaking when the IP changes. There are two methods:
Method 1: Through the motionEye web interface (easiest)
- Open the motionEye dashboard in your browser
- Click the gear icon in the top-left to open main settings
- Scroll to the “Network” section
- Change from “DHCP” to “Manual (Static IP)”
- Fill in the following fields:
- IP Address: Your desired static IP (e.g.,
192.168.1.50) - Subnet Mask: Usually
255.255.255.0 - Gateway: Your router’s IP (e.g.,
192.168.1.1) - DNS Server: Your router’s IP or
8.8.8.8(Google DNS)
- IP Address: Your desired static IP (e.g.,
- Click Apply. The Pi will reboot with the new static IP.
Method 2: DHCP reservation on your router (recommended)
This approach assigns a fixed IP to the Pi from the router side, without changing any settings on the Pi itself:
- Log into your router’s admin panel (usually at
192.168.1.1or192.168.0.1) - Find the DHCP reservation or Address reservation section (location varies by router brand)
- Find your MotionEyeOS Pi in the connected devices list (look for the hostname starting with “meye-“)
- Copy the Pi’s MAC address and assign it a fixed IP address
- Save and reboot the router if required
Important: Whichever method you use, pick an IP address outside your router’s DHCP range to avoid conflicts. For example, if your router assigns DHCP addresses from .100 to .200, use a static IP in the .2 to .99 range (like 192.168.1.50).
How do I uninstall MotionEyeOS completely?
Since MotionEyeOS is a full operating system flashed to an SD card (not a software application installed on top of another OS), “uninstalling” it means wiping and reformatting the SD card. The process is straightforward and takes just a few minutes.
Before you uninstall – back up your data:
- Recordings and snapshots: If you stored footage on the SD card, copy it off before reformatting. SSH into the Pi and check
/data/output/for saved media files. - Configuration files: If you might reinstall MotionEyeOS later, back up
/data/etc/via SCP so you can restore your camera settings.
How to wipe the SD card:
Windows:
- Insert the SD card into your computer
- Download and run the SD Card Formatter tool from the SD Association (free). It handles multiple partitions cleanly.
- Alternatively, open Disk Management (right-click Start > Disk Management), delete all partitions on the card, then create a new FAT32 volume.
macOS:
- Open Disk Utility (Applications > Utilities)
- Select the SD card from the sidebar
- Click Erase, choose MS-DOS (FAT) format, and click Erase
Linux:
- Open a terminal and identify your SD card device:
lsblk - Unmount all partitions:
sudo umount /dev/sdX* - Wipe the partition table:
sudo wipefs -a /dev/sdX - Create a new partition and format: use
fdisk,parted, or thegpartedGUI tool
Why the card may show as smaller than expected: After running a Linux OS like MotionEyeOS, the SD card typically has multiple partitions (boot, root, data). Windows may only show the boot partition size (e.g., 50 MB instead of 32 GB). Using SD Card Formatter or Disk Management to delete all partitions restores the full capacity.